For the last 7 years, our basement has been completely overtaken by our children. Toys everywhere, plenty of stains, very little decor, and plenty of neglect. We never cared what it looked like because it was covered in toys regardless. Why put the effort in, right?

Well my family is growing up and our needs are different than what they used to be. I don’t have kids that spend hours going from toy to toy anymore. I don’t need space for big, bulky, brightly colored toys any longer. My boys love sports and bypass every toy they have to play with a ball instead. And for Mya…well, she’s never been a toy player. She likes to take one thing and use her imagination. Most toys don’t allow for that imagination. They limit what you can do and she’s just not a fan.
So I’ve been slowly realizing how much potential we have in this neglected space, but there is one feature that has limited us so much. The height of our basement. We were…um, let’s say blessed…with a drop ceiling in our 1985 home. We’re nearing 40 years with these ceiling tiles and age is showing. When I moved a few away for the first time and took my first peek at what was behind those, I realized there was plenty of dust, plenty of wires, and also PLENTY OF SPACE!

I was granted FIVE extra inches from the original drop ceiling height to the bottom of the ceiling joists above. Five inches is dramatic in an 8′ ceiling. I had to get to work to remove this because I knew just how much could be gained here!
I’m going to share with you all the steps that I took to remove these tiles and transform this space, but please keep in mind, there may be something very different behind your tiles. You may not have the overabundance of wires, you may not have heat vents covered (yes…covered), and you may not have the same electrical in place. Every basement is built differently so please use this tutorial as a jumping off point for you and a little inspiration to tackle this project that you may be putting off or may not even know you can do in the first place. And believe me, YOU CAN DO THIS!!

Materials Needed
Mask/Tshirt for covering your nose and mouth
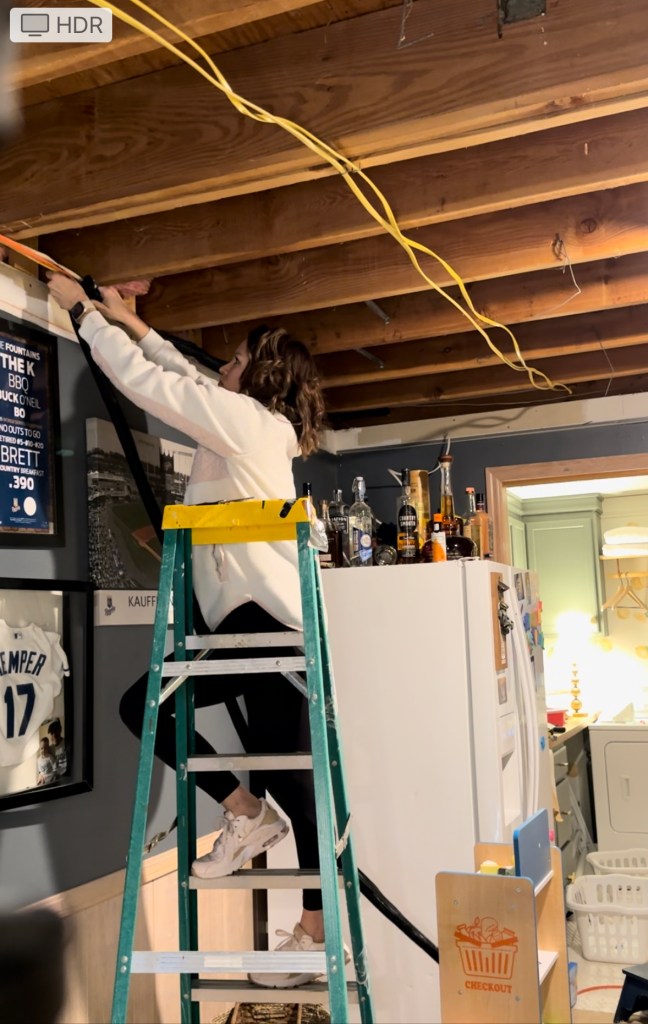
Ladder
Small crow bar
Hammer
Scissors
Electrical Staples (I was able to collect these when removing the old cable lines)
Straight Boot Duct Fitting (I used these to finish off my ductwork that I found covered)
Flat Paint (I chose Sherwin Williams Peppercorn)
The Process
Demo!
The first step is all about the removal. Grab a heavy duty mask or throw a tshirt around your face because what’s lurking on these tiles can be A LOT. I had rat poison in some areas, plenty of dust everywhere, and a lot of building materials that have just sat on those tiles for almost 40 years.

To remove, simply lift up the tiles, angle them and slip them through the metal grid. Some were more difficult to remove and I did have to break the corners off with my hands to be able to navigate it through the grid. Check to see if you have a local Habitat for Humanity Restore because ceiling tiles in good condition can be donated there!
Next up is the metal grid. Some of the crossbars are simply looped together with a metal tab. Lift the metal bar and slip it out of the tab and it will be freed. However, there will be others that are secured with nails to your walls or to one another for stability purposes. You will need a small crow bar and a hammer to remove these by prying them off the wall.

We had fluorescent lights hanging throughout our basement. This is also the time you will need to cut your power and carefully remove these from the gridwork. I ended up having one crash down because I waited too long to remove it from the grids. Be very aware of these and remove them before they lose their stability and potentially fall.
Look at What You Gained!

When the removal is complete, just step back and see exactly how much ceiling you gained! I had 5″ of extra ceiling space, but with an exposed ceiling, your eyes will be drawn much higher because of the open concept. To the top ceiling…almost 12″ of extra height!!
Removing Unnecessary Wires
Okay, back to work. The next part is removal of the old lines that are still in your home.

In our case, we had a slew of old phone lines and cables that ran all over our basement. I spent quite a bit of time following lines and getting my husband’s opinion on these before cutting them away. I did not want to cut the wrong wires down…especially since we have so much electrical running from our fuse box here. If you are not confident in this area, seek a second opinion or get an electrician to do this portion for you.
Wrangle In Remaining Wires
When I removed a lot of the cables, I collected a ton of electrical staples that I saved for this part.

These are large staples with a flat top used to hold wires to ceiling joists. Once the old wires were gone, I needed to make a plan for how to condense the amount of electrical wires running along the ceiling. For wires that were around one another, I grouped them together and used a small tack hammer and the electrical staples to attach the wires together to the joist. This keeps them from hanging low off the ceiling and in a neat bundle.
Some may want to keep the electrical wires exposed and just simply paint over them, but I wanted to cover them and make it look more like a pipe running along the basement ceiling than to have multiple wires. Plus, I knew it would be more difficult to paint in between each wire when I was spraying. I did a lot of research on the best and most cost-efficient method to covering multiple large wires and I stumbled on this Wire Cover from Amazon. Running 25 feet, you can purchase a 1 1/4″ mesh cover that you can open around the wires, close and secure it tightly. It was simple to paint and really simplified a few areas that had more “noise” than I wanted.

Replacing Air Vents

When our tiles were removed, I found three vents that were completely covered. Yes, covered. Our basement had a reputation for being extremely cold and now I come to find out we had three heat sources that were COVERED?! I did have to add a bit of ductwork but it was a breeze with these Speedi-Boot™ 4″ x 10″ x 6″ Straight Boot Duct Fittings that I found at Menards. They connected at the existing ductwork and then had adjustable arms that can extend to be nailed directly into your ceiling joists. The arms extend out to 14″ so I was able to easily adjust them out, nail into the sides of two joists and it was ready to have a 10″ x 4″ face plate installed and DONE!

Change Lighting
Our basement ceiling had three large fluorescent lights that were suspended in the metal gridwork. I no longer needed those abrasive lights because I’m planning to use more sconces, lamp light, and ceiling light fixtures instead. To remove these bulky lights is more of a two person job because you will have to lift these fixtures up out of the gridwork, remove electrical and then gently lay it down to the ground. Not the easiest with one set of hands.

My replacement in the main basement area was can lighting. I purchased 3 can lights to replace the exact locations as the old fluorescent ones. This is not much light AT THIS TIME, but I didn’t want to install and then uninstall when I was ready to purchase the new fixtures. We are just rolling with dimmer lighting and more lamps at this time. You will need to be prepared and have a plan in place for how you would like to rework your lighting as these big fluorescent lights are attached to your grid and will have to be changed or hung in a different way.
Painting Prepwork
You’ve made it. You’ve come all the way to the end and it’s all about prepping your area for paint. Since I was using a paint sprayer, I wanted to ensure my entire basement was covered to avoid any overspray from getting on my carpet, my couch, or any of the items still remaining in the room. This part of the process is tedious and very time-consuming BUT it’s extremely important. I purchased three rolls of painters tape and a 12-pack of plastic sheeting from Lowe’s and I went to work taping around the entire basement.

I put a full row of tape across the entire top of the plastic sheeting to avoid any paint getting underneath and then ran a column of tape to connect each piece to one another as I worked around the room. I also connected the plastic on the walls to the plastic or canvas drop cloths that I used on the floor. I completely enclosed myself into the space so that I knew no paint would be able to get through the cracks.
Canvas drop cloths are an investment, but they have a lot of perks to them over plastic. If you spill paint on plastic that is covering your floor, it will just remain sitting on the plastic and you run the risk of slipping on it or stepping it in and carrying it all over on the soles of your shoes. Canvas is much more absorbent, it remains in place the entire time you’re using it, and can be reused for years and years, project after project. I’ve had my canvas cloths for over a decade and I’m still pulling them out and using them first every single time. It’s an investment piece that pays off ten fold if you have painting projects on the horizon.
Painting
I absolutely LOVE my Graco TrueCoat 360 DS Paint Sprayer. It’s done multiple jobs for me and does it well every time. The benefit to this sprayer over others is that it doesn’t use a straw system to suck paint out to sprayer but it uses a suction system instead. This allows you to hold your sprayer at any angle, upside down included, and still have a clean spray. It’s perfect for a ceiling project where you are constantly holding the sprayer at odd angles!

For my ceiling, I chose the color Sherwin Williams Peppercorn. A deep, dimensional charcoal color that can look almost black in the darkest corners. I know I’m going to be using a lot of black accents in my basement so I chose a grey color to not overwhelm the space with the same tone. I wanted something a tad lighter that can coordinate with a lot of the other colors I envision using in this space. For the ceiling, I chose a flat sheen to keep light reflection to a minimum.

As I spoke about before, when you spray, there is plenty of overspray from your machine. And when the spray is coming down off your ceiling, it’s going to fall directly on YOU. To eliminate being completely coated in Peppercorn, I purchased a coverall suit and reusable face cover. The hood worked perfectly to cover my hair and the bulk of my forehead that the face mask didn’t cover. I had minimal spots that any paint had any chance of sticking to, and it was much simpler to scrub off those small areas than my entire body. Plus, I am able to keep these two pieces for future projects to keep my clothes paint-free when I choose to wear my nicest clothes to work on these projects. Anyone else guilty of that?

I did have to do two coats of paint on the wood because the raw wood absorbed so much paint the first pass. You could most certainly do a coat of primer first and then paint, but I chose the paint + primer combo and did two passes instead.
Sit Back and Enjoy Your Work

This project is not a costly one. It’s an inexpensive, but more labor-intensive project. The most difficult parts are the removal (cost: $0) and the prepwork to paint (cost: roughly $24). Painting is extremely quick with a paint sprayer and the ability to get in every nook and cranny of the wires, the joists, and the ductwork was key. I truly wouldn’t recommend trying this with a paint brush or roller. There is just so much to reach and with it all being above your head, the fatigue in your arm and shoulder would be monumental.

The end result gave us a higher ceiling, a beautiful industrial feel to the space, and a clean slate to make this basement into the vision of our dreams! I hope this tutorial showed you the how-to, but also provided you with the motivation you need to tackle this project. You CAN do this and I can’t wait to see what you create!


 Luxury Vinyl Plank Flooring Tutorial with Flooret
 Electrical Tape Sliding Door Grid Hack
 Kid’s Kitchen Makeover
 Board and Batten Paint Colors – And Examples to Prove It!


[…] been project by project working through our basement remodel. First it was to take down the drop ceiling tiles and paint the exposed ceiling, then it was build a DIY murphy bed and built-ins in our basement guest room, create an office […]