This has been a long time coming and I’m so excited to finally share with you all the ins and outs of painting my outdated guest bathroom tile…with a six month time lapse to show you exactly how well this holds up! After I posted my kid’s bathroom reveal in August, I was ready and geared up to share with you how I painted this tile, but the question weighing on my mind was just how well this was really going to hold up. We have three kids, we have two dogs, and we haven’t left our home in a fiscal year (😉), so could this tile redo really have staying power? I couldn’t just give you the rundown and then leave you hanging. I wanted to LIVE in this space, USE this space, and put it through the wringer before I shared how to do this in your own home. Because if it’s not good, I don’t want you to waste your time.
But guys, it’s good. It’s so, so good!

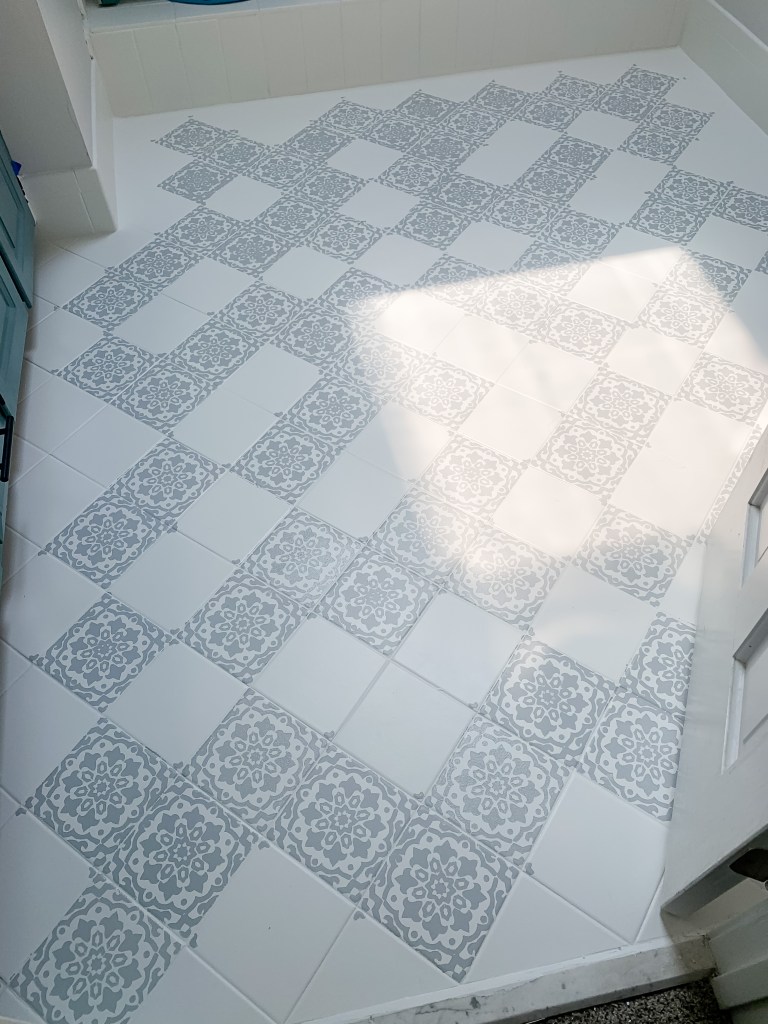
Six months down the road and it’s holding up to the test of time so well. And beyond the normal wear and tear of normal bathroom use, we also housed our dog bowls in this space to keep it out of reach of our now mobile toddler who is just infatuated with their food. Still in great shape.

Cleaning you ask? Hasn’t phased it. Scrubbing with a rough brush all around the base of the toilet floor because of…umm…boys…hasn’t flaked up the paint at all.
I’ve bleached the floor, scrubbed it down, had an entire family of 5+2 dogs in this space at the same time, I’ve walked on it with heels, I’ve done it all. And the result is still as great as the day I finished it.

This is a durable, long-lasting, dramatically space changing DIY that is worth the effort. I’ve actually thought that thought every single time I’ve walked past this room.
As I talk to you about the steps I took for this project, please note that I painted the tile in my shower, as well as the tile on the floor. The pictures I’ve used to help with the tutorial will be coming from both projects to help you see how it all came together.
So let’s get to it! The ins and outs of painting your tile with a full tutorial, pictures, cost breakdown, and timing needed.

HERE’S WHAT YOU’LL NEED
- Powder Barkeeps Friend
- Tile and Grout Brush
- Spray bottle
- Painter’s Tape
- Degreaser
- 150 grit sandpaper
- Orbital sander – or you can use a 150 grit sandpaper block instead
- 2 – 1/4 inch nap roller
- 1 1/2 inch angled paintbrush
- Small paint tray
- Tile Stencil – Amalfi Stencil from Cutting Edge Stencils
- Primer
- Porch and Patio Paint x2
THE PREPWORK
You will have to do the work to get your tiles paint-ready or you’ll regret it later. If the tiles aren’t prepared for paint, the paint won’t adhere to it and it will flake off easily with wear and tear.

To get started, grab a powdered Bar Keeper’s Friend from Lowe’s, Target, Amazon or local hardware store. Sprinkle a little on the grout in a small section and wet it with a spray bottle. Immediately scrub your grout with a tile brush to lift out dirt and grime. Wipe away with a wet rag and you’ll instantly see a change and wonder why you haven’t done that before.
After cleaning the grout, I sprayed a small section of the tiles with a degreaser and scrubbed with a damp sponge to lift out the grease and residue on the tiles. I followed up with a clean, wet rag to wipe off any remaining degreaser on the tiles.
Now that your tiles and grout are cleaned and degreased, your final prep comes from sanding. Your goal is to create traction on your tile for the paint to adhere to it, without scratching any of it. For that reason, I used an orbital hand sander with 150 grit sandpaper to lightly sand the tile floor. Don’t have a sander? A 150 grit sanding block works just as well!
And finally, it’s time to clean up the floors one final time. I used my vacuum’s attachments to clean up any remaining dust, dirt, and debris from the floor, working from the back of the bathroom to the front by the door so I wasn’t tracking any additional dust in the room. For good measure, I also mopped the floor (working from the back to the doorway again) to be sure it was as clean as possible for paint the next day.
PAINTING THE TILE
*Before you begin painting, be sure you are using painter’s tape around baseboards, walls, vanity/furniture, etc. Most of your painting will be done with a roller which you don’t have as much hand control as you would with a paintbrush while you’re working. Taping first will allow you to concentrate more on the tiles than on keeping your walls paint-free.*
The very first step is the primer. Please do not skip this step! The primer serves as the strongest adherer to the tile and the source that your actual paint will adhere to, so skipping it will lead to your paint flaking easily.
I used Zinsser water-based primer for this job, but you can choose from the many options available on the market. Just be sure it can be used on tile. Great news when it comes to the primer: If you get a quality primer, you only need one coat!
Friendly reminder: Be sure you’re painting yourself out of the room!
In small sections of tile, I used a small 1 1/2″ angled paint brush to paint my grout lines first and then used my nap roller to roll the tiles. By doing grout first then rolling over it, you avoid brush lines and make for a smoother coat. Allow your primer to dry as directed on the can instructions.

Now it’s time to paint your base coat! I chose to use Porch and Patio paint for this project because you are able to get any color you wish (Valspar, Sherwin Williams, Behr, etc.), PLUS it’s meant to be used on your porch and patio, withstanding the harsh elements day in and day out. Of course it can withstand the wear and tear of a bathroom!
I purchased two cans of Porch and Patio paint from Home Depot.

Base Coat: Sherwin Williams Greek Villa
Stencil Coat: Behr Hailstorm Gray
I used the same method for the base coat as I did for the primer. I worked in small sections (starting at the back of the room and working towards the door!) painting the grout lines first with an angled brush, followed by the nap roller on the tiles. I allowed this base coat to dry for a full 24 hours to allow it to fully cure on the floor. Be sure that you keep your door closed (if possible) in between coats to avoid dirt, dust, and hair from getting onto the tiles as it dries.
I felt that my tiles needed two coats of the base color to get the richness that I was looking for. You may not need two coats for your tile project, but going from a blue tile to a white paint and an orange-y tile to white definitely needed two! Again, allow to dry for a full 24 hours before moving on to the stencil phase.

STENCIL TIME

To make a statement on the floor, to show less dirt and marks, and to keep the room from looking too washed out, I knew I wanted to stencil a design. If you’re anything like me, you’re hesitant. I didn’t want to put the work into painting the floor and then totally mess it up by improperly stenciling. I felt like there was a lot of risk here and I questioned myself day in and day out.
But guys, it’s so much easier than I thought it would be! The most difficult part? The time. You aren’t able to start at the back and work your way to the front. No two tiles around one another can be stenciled without proper dry time in between. It was a process. But the actual technique of stenciling? A piece of cake!
I found some really great options on Amazon, but some of the reviews warned of too much flimsiness. If you’re a pro already at stenciling, these may be great options. I was more wary. I wanted something substantial so I went with the highly rated Amalfi stencil from Cutting Edge Stencils. The reviews were wonderful and I couldn’t resist this Bohemian/cement tile look of the Amalfi one!
Stencils can come in the typical tile sizes, or can be customized to be whatever size you need. To find the right size, measure length and width of your tile sans the grout lines…and then measure it three more times to make sure you got it right. In my case, I had perfectly square 6″ x 6″ tiles, so I was able to get the small size for under $10. Some of you may not be so lucky. Your actual stencil will arrive larger than your tiles (don’t panic!). This allows for paint splatter and marks as you’re working, but the actual design will be exactly what you ordered.

When it’s time to start, choose a starting point that gives you a little bit of wiggle room if you make some beginner mistakes. I chose to start on a full tile where I didn’t have to mess with edges or corners just yet, and in an area that I knew the bath mat would cover in case there was a learning curve.

Be sure you line up your stencil on your tile, focusing that you have it lined up on all sides and you’re happy with the location before using painter’s tape to tape it to the floor. As I got more comfortable with the process, I was able to actually stop taping it down to the floor and I just held it down with my fingers, but keep in mind, I had a smaller stencil that I was working with. You may need to stick to taping it down each time with painter’s tape if you have a larger tile that may wiggle as you roll with your roller.
When you’re lined up, roll your roller in your paint and roll off the excess as much as possible on your tray. You want very little on your roller. Lightly roll your roller along your stencil, using as little pressure as possible. The more paint you use and the more pressure you use, the more possibility that the paint will seep underneath and ruin your design.

After you complete each stencil, move to the next tile that is NOT ADJACENT to the one you just worked on. Your stencil will overlap onto the tiles around it so you must skip around your room (working your way out!) to avoid laying your stencil down on a tile with wet paint.
For this reason, I would spend the morning doing a set of tiles, then come back for another round of tiles at night, and then again the next morning, and on and on until the room was finished.
When it comes to the edges and corners, I was thrilled with how well Cutting Edge Stencil’s were bendable. I was able to easily bend my stencil and lay it along the partial tile/partial wall and roll as I was with the full tiles. It’s a little more of a process to line the stencil up each time, but that was the only difficulty I faced.

I did not have to ever do a second coat of paint for my stencil. One coat did a great job of covering and coming out exactly as I’d planned. If you have high contrasting colors, you may have to do additional coats.

ADVICE FROM THE OTHER SIDE

If I were going back and doing this project all over again…
- I would wear my hair up in a ponytail as I worked through all the cleaning and painting steps of this process. I had to stop painting more than once because one of my long hairs was on the tile. Although others probably would never see a hair underneath the layers of paint, I WOULD. For the work you put into it, pull up your hair.
- Don’t wear shoes in the space. The foot prints, the dirt, the pressure…It’s all a recipe for disaster. Stick with socks as you’re working.
- Buy 2 stencils so you can have two working at the same time, especially if you feel like your contrasting colors will need two coats. You can roll one coat, work on the next stencil in another area, and then go back and roll the second coat without wasting any time.
- Save your hardest corners of your room for the very end in the event that you need to cut your stencil to fit around the space.

- If you have any paint seepage or issues after you’ve painted your stencil, go back with a small craft brush and do any touch-ups you may have. No need to redo an entire tile for some small mistakes. And have grace with yourself. Not every mistake needs to be fixed. No one else will ever notice them, and especially not unless they’re eye level with your floor (and who really is doing that?!)
- If you have a very high traffic area and want extra protection, cover your floor with a water-based polycrylic to give it a top coat. I would do upwards of 3 coats of polycrylic using a paint brush to brush across your grout and tiles.
COST BREAKDOWN
Here’s the cost of every material, giving you the total cost, if you started without anything. So, keep in mind your cost is going to be significantly lower if you already have the base materials (sandpaper, paintbrush, cleaning materials, etc.).
- Powder Barkeeps Friend – $2.18
- Tile and Grout Brush – $8.26
- Painter’s Tape – $5.98
- Degreaser – $2.48
- 150 grit sandpaper – $9.97
- 2 – 1/4 inch nap roller – $4.48
- 1 1/2 inch angled paintbrush – $8.48
- Small paint tray – $2.48
- Tile Stencil – Amalfi Stencil from Cutting Edge Stencils – $9.95
- Primer – $10.98
- Porch and Patio Paint x2 – $29.98 x 2 = $59.96
TOTAL COST:: $125.20
TIMING
Day One: Prepwork and Primer
Day Two: 1st Base Coat
Day Three: 2nd Base Coat
Day Four-Six: Stencil – This will drastically vary based on the size of your room, the number of tiles in your space, and how much time you have throughout the day. Remember, I was able to do about three rounds each day of non-adjacent tiles. You may need to plan for more days if your days don’t allow for multiple rounds.

There hasn’t been a day that’s gone by that I don’t stop and take a second look at this room. The before and after is dramatic, and I did it all under $200. A little effort, a whole lot of wow! A game changer at a FRACTION of the cost of a full tile renovation…with a lot less mess. You. Can. Do. This!
xx Rachel

 Stenciled Painted Floor Tile
 Modern Meets Traditional Staircase Remodel
 Kid’s Kitchen Makeover
 Drop Ceiling Tiles to Exposed Basement Ceiling


Leave a Reply