It is finally here! It’s REVEAL DAY! Eight full weeks of challenging myself, learning something new every single day, and finding such joy in making a space in my home that was long forgotten not only beautiful, but functional, too. I can proudly say with my shoulders back, my head held high, and a strut in my step…I DID IT!!


Going back to the start, this basement laundry room was a shared space. Equal parts laundry room, storage room, and HVAC closet. There weren’t any shelves, any separation of space, and no actual functionality of a laundry room beyond a washer and dryer. Wet clothes were thrown on top of plastic bins instead of being hung to dry, detergent and dryer sheets were housed right on top of the dryer, and clothes were folded on the basement carpet outside the room. Plain and simply, it just didn’t work for a house with three little kids and a boatload of laundry everyday.

Week One // Week Two // Week Three // Week Four // Week Five // Week Six // Week Seven
The goals were lofty in this laundry room, but we went from such bare bones to a space that I can use for laundry AND for storage. Before, it was haphazard stacks of boxes on top of each other full of what can only be called “collected junk.” I purged nearly 90% of the contents and put others in the attic while sorting out what made the most logical sense to be stored in our laundry room. Having a space to put seasonal tableware, extra decor pieces, as well as all my laundry necessities, is a total game changer. Things are kept neat, tidy, and in better shape than when they’re thrown in tubs on the floor.

Walling off the space didn’t restrain the size of this room at all. We were able to close off our utility area that houses our furnace and our water heater, leaving ample room for anyone to come to repair, if needed. *Note: Please God, don’t let this be the time that we need repairs, okay? Great, thanks!* And I chose a louvre door to be beyond cautious that there was adequate air flow for the furnace.


The matte octagon tile floors was my first big project in this space and the first solo stint using a wet saw. I just love how the shape of the tiles brings a little added dimension and character to the space and brightens up without being too overpowering. I knew I wanted to do subway tiles with bright white grout on the walls, so this was a more toned down, subtle white with a light grey “Frost” grout color.

Speaking of the subway tile, I just fell head over heels in love with the bevel to these tiles. The gloss, the color, and the dimension of these made them stand out and show off this space. Knowing that there would be large cabinets, moulding, a folding counter, AND a utility sink occupying this wall, I wanted something to stand out and really pretty up what little wall remained showing.


One of the largest pieces to be added were the cabinets. Two 30″x30″ cabinets on one wall and two 18″x30″ cabinets above the washer and dryer. I purchased these very basic cabinets from Lowe’s during their Memorial Day sales and jazzed them up with this beautiful green-grey paint called Pewter Green by Sherwin Williams. The added crown moulding above the cabinets gave these the look of custom with a much more inexpensive price tag.
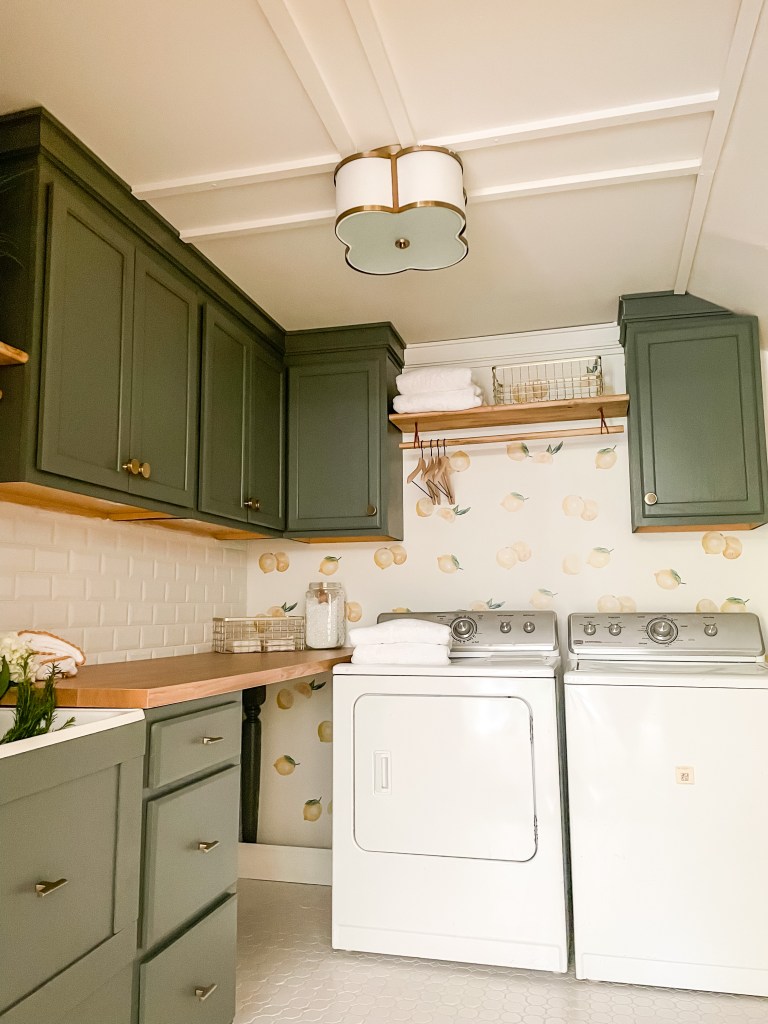

Plus, I added this gorgeous champagne gold knobs from Amerock that add a beautiful metal contrast. And the weight of these knobs make them look far more expensive than they actually are. Something smaller can tend to look more unoriginal and purchased at a big box store. And the added detailing along the edges bring a subtle touch that makes you give these beauties a second look.


As for the 3-drawer cabinet holding up our folding counter, I went with Amerock again to ensure the champagne gold was the same for both upper and lower cabinets. I didn’t want to use a different company that may have a different shade of gold and make the hardware look mismatched or clashing. These pulls take a different approach by being smaller and subtler than the knobs. I didn’t want something too large that I could possibly bump while I was moving around the room. I just had visions of thigh bruises as I was milling about. And listen, there’s still a solid chance I’m going to bang into the side of one of these pulls one day, but I’ll just pretend it would have happened much more with a larger pull.


I knew I wanted to have shelves installed to allow for a fun hanging rod to seemingly float underneath. My initial dream was a floating shelf in the space above the washer and dryer and above the utility sink, but I don’t own a brad nailer in this house. To purchase one (mind you, I already bought a wet saw early in this project!) would have pushed my budget over and I didn’t want that to happen with a tool and not a design element. To purchase custom floating shelves to fit this space would have majorly broken the bank (like shattered to smithereens kind of break). So I got creative and thrifty.

My shelves were made from $10 stair treads from Lowe’s that were stained Puritan Pine and installed into the sides of the cabinets and by using galvanized steal floating shelf brackets from Amazon. You use a 1/2″ drill bit to drill directly into the tread roughly 5 1/4″ deep. Install the bracket on the wall with two screws and your shelf slips right onto the bracket and holds steady. Each bracket set holds roughly 50 pounds of weight so my baskets and pretty towels will do just fine up there!


The hanging rods were a complete necessity for this room and I wanted to make it a little more appealing by adding a leather element to these. I purchased a bundle of this leather cording from Michael’s and screwed two loops into the shelf above. The dowel rod slips right through the loops and hangs. This was a pretty way to make something so functional and so necessary for our laundry room. No more hanging my wet clothes on extra diaper boxes or a camping tent for me! Look at me adulting. 🙂


And the very last piece that makes me smile each and every time I come into this space are my sweet little lemons. These are just decals I purchased through Urban Walls at the very beginning of this project. One of those pieces you see, you can’t get out of your mind, and you are just so excited to use them to transform the space. This room was beautiful, classy, and stunning before these lemons, and I do believe it is still very much that, but it’s now also a little bit more fun. A little happier. A little brighter. And we all need a whole lot of that when it comes to the monotony of laundry. And if I ever change my mind and want them gone, you just peel them right off the wall and you’ve got a clean slate again. I’ve used Urban Walls in Mya’s nursery before and they are so well made, hold up through years of wear and tear, and look as good now as they did the day I placed them on the wall.


I really do love everything about this room. It brings me so much happiness to walk into this space for the third time to restart the dryer to “get the wrinkles out,” and I find myself walking in a little lighter, a little brighter, and a whole lot proud of me. This was a lot of work and I did it. I did it with three little ones 5 years old and under. I did it while still managing a house, a family, and a life. I did it with a smile on my face the entire time. I did it, guys, and I’m so happy I did.

Thanks for following along on this journey! Don’t forget to check out all the participants in this year’s One Room Challenge. They’ve made beautiful rooms with so much personality and are oozing with tips, tricks, and inspiration! I’m so proud of each and every one of you. Everyone, we did it!! Congratulations!

xx Rachel
For all the sources, check out my full list below!

Leather Hanging Straps for Hanging Rods
Wire Baskets – similar found HERE
Towels, Faux Plants, Garbage Can

 One Room Challenge – Week SEVEN!
 One Room Challenge – Week SIX!!
 One Room Challenge – Week FIVE!!
 One Room Challenge – Week THREE!


Even I would love to do laundry here! Gorgeous details!!
Thanks so much, Libbie!! It does make such a difference to have a happy place to do such a boring chore!
Such a fun space! I actually really like the open space under the counters next to the washer/dryer, congrats 🙂
Thanks so much, Nicole! I love having a space to keep my clothes baskets out of the way and a place to hide away my garbage can. More storage with cabinets is always nice but sometimes you just need some open spots to hide things away!